Coffee Panna cotta


IMG_3888

Hi there!

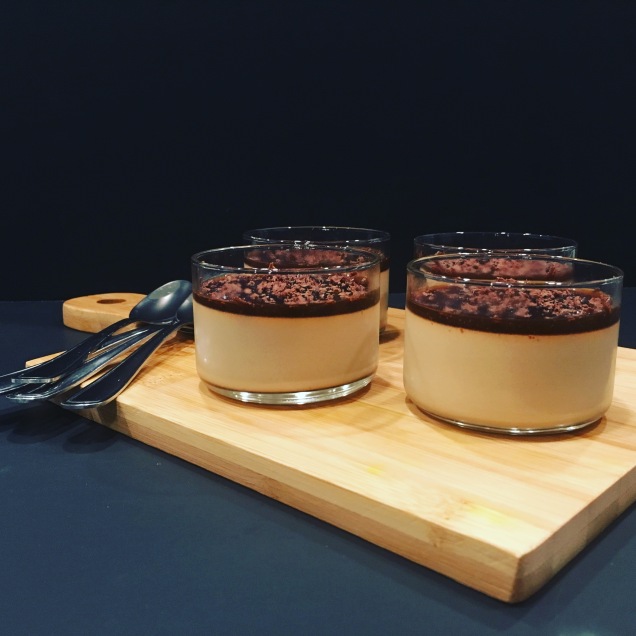
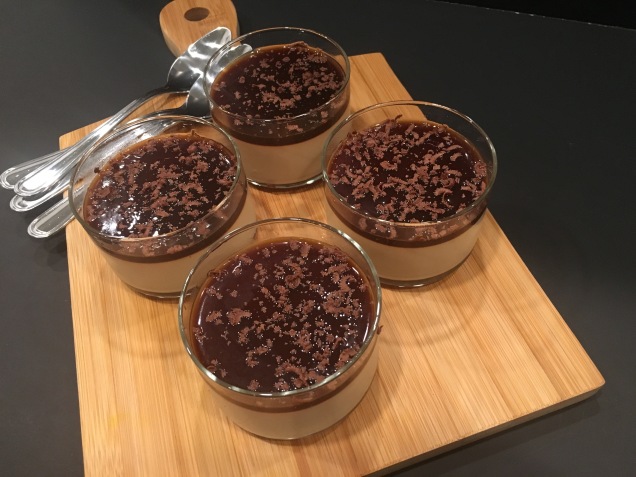
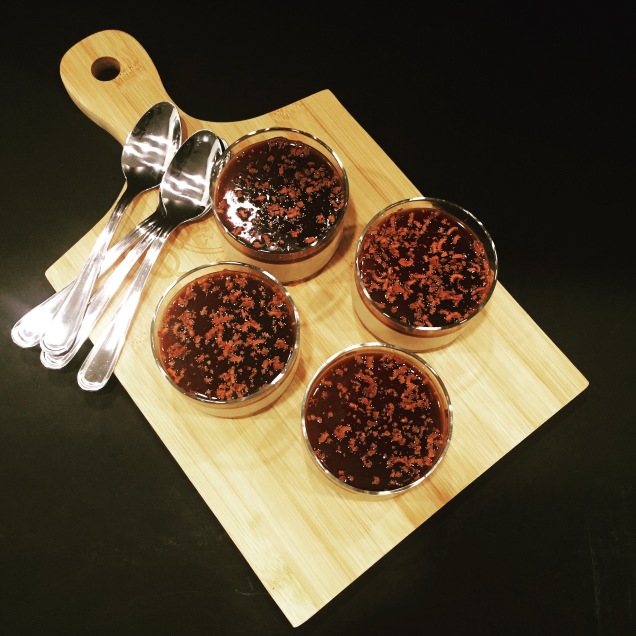
Sorry for being away, but I promise this recipe will definitely cover up for my time away from the site. I have tried several Panna cotta recipes with subtle flavors. For those of you who do not know what Panna cotta is “an Italian dessert of sweetened cream thickened with gelatin and molded.” I decided to try something new with strong flavors this time. Who doesn’t love coffee and if you have never tried Panna cotta before, you must! It has a  smooth, creamy texture and you can play with any flavors you love most. I must say this dessert can be prepared in no time and is always a crowd pleaser.

Please try this new recipe and leave me your comments below.

Ingredients 

  • 2 tsp (about 7 gm) gelatin powder
  • 3 heaped tsp (about 6 gm) coffee powder
  • 250 ml milk, room temperature
  • 250 ml whipping cream
  • 1 tsp vanilla essence
  • 3/4 cup sugar
  • ⅛ tsp salt
  • milk chocolate bar, shaved, for garnish

For the espresso gelee layer:

  • 1/2 cup brewed strong espresso
  • 1 tablespoon sugar (more to taste)
  • 1/2 teaspoon unflavored powdered gelatin

IMG_3941

Method

  • Measure 2 tablespoons of milk from the recipe and mix with the gelatine powder. Let it sit until softened. Take out another 2-3 tablespoons of milk to combine with coffee powder. Set aside.
  • Use a sauce pan to heat the remaining milk, whipping cream, sugar and salt over medium heat until sugar is dissolved. Stir in the gelatin. Ensure it is dissolved completely.
  • Remove from heat. Pour in the coffee mixture and stir to combine well. Drain through a fine sieve. Pour into the cups and jars. Chill in fridge for at least 2 hours before adding the next layer.
  • In a small sauce pan mix together the espresso and sugar. the strength of espresso can vary based on the coffee taste you prefer. In a small bowl dissolve the gelatin in 2 tbsp water. Once it is completely dissolved add it to the hot espresso. Refrigerate the gelee until just cool, but still good to pour.
  • Pour a thin layer over the Panna cotta and allow it to set.
  • Add chocolate shavings and serve it chilled. This can be made up to two days in advance.

I hope you enjoy this coffee preparation for your next event/ get together.


IMG_3889

Pistachio Truffles


fullsizerender-3

Hello folks,

As I mentioned it my last blog post, I will share another recipe from the left over Pista paan mithai. Here it is Pistachio Truffles. It is a good fusion dessert, quick and easy dessert.

What Is A Truffle?

Understandable: balls of ganache, coated classic-style, or enrobed in chocolate. Also understandable: squares of ganache. Modern truffles can be coated in peppercorns, sweet curry and paprika and can be enrobed in couverture. But they still have a commonality: balls, squares or other shapes, filled with ganache.

What Is Not A Truffle?

Anything else, including fruit cremes and other creme centers, whipped cream-filled chocolates, and any filled chocolate that isn’t filled with ganache.

Although my truffles are not gooey and soft, they have some nuts filled in the center, but they are dusted with pistachio powder and are round in shape. I decided to call it Pistachio truffles.

The ingredients mentioned below can easily result in 18-20 truffles.

Ingredients

For Pista truffles

  • Pistachios 2 cup
  • Milk Powder 1/2 cup
  • Corn flour -2 tsp
  • Powdered sugar -2 tbsp.
  • Edible green color 8-10 drops
  • Condensed milk -4 tbsp.
  • Cardamom powder 1/2 tsp

For Filling

  • 4 tbsp. pistachios, blanched, peeled and chopped
  • 4 tbsp. almonds, blanched, peeled and chopped
  • 4 tbsp. walnut, chopped
  • 8-10 drops Kewra essence
  • 1/2 teaspoon cardamom (elaichi) powder
  • a few saffron strands(optional)

For the outer covering/ dusting: Raw pista (fine) powder.

Method:

  • Place a small size pan over medium heat and add the shelled pista (pistachios) Roast the pista (pistachios) at medium low heat by continuously flipping so that they don’t get burn.
  • Let the pista cool down and then grind them in mixer to a fine powder. Sieve the powder to get rid of any bits of pista left.
  • Add the milk powder, sugar, cardamom powder and corn flour. Mix it well, add few drops of edible green food color. Add 1 tbsp. of condensed milk.
  • Mix it with hand, it will turn into crumbly texture, keep adding condensed milk 1 tbsp. at a time until you can form a dough. If not add little more condensed milk.
  • PS: Don’t knead the mixture too much else pista will release oil and it will be difficult to handle.
  • Chop the dry fruits and set aside.
  • Remove the shell of 8-10 pista and using a blender finely powder it. Keep it aside.
  • In a small pan take 2 tsp of butter or ghee (clarified butter) on low heat, add 3 tbsp. of condensed milk and stir it. Add chopped dry fruits, cardamom powder and kewra essence. Stir for 1 minute and turn off the heat.
  • PS: Do not cook the filling mixture for long time else it will get hard like rock. Now keep the filling mixture aside.
  • Divide the dough into small balls. You may decide on the size and modify. Since I was using the left overs from (Pista Paan Mithai), I divided into equal portion and scrapped just a little bit.
  • Before rolling the small dough into perfect rounds, add small amount of the filling mixture. This is to give it a Paan flavor and some texture as you bite into it. using your hands roll into perfect rounds. Pista should release enough oil so you won’t need ghee or oil to give it a smooth texture.
  • Make sure there is no coarse pieces int he finely powdered pista. Roll each truffle one by one with pista powder.
  •  Delicious Pistachio truffles are ready!!
    fullsizerender

Pista Paan Mithai


fullsizerender

Hello everyone,

I am back after a long time. I was caught up amidst setting up the house, job and catching up with friends. As you all know setting up the house is not an easy job. It’s fun but same time tedious. I am done setting up my living room so far and next up is the kitchen and dining (area where I spend most time and enjoy every bit of it :P)

We recently celebrated Diwali on 29th Oct. Diwali or Deepavali is the Hindu festival of lights, it spiritually signifies the victory of light over darkness, good over evil, knowledge over ignorance, and hope over despair. The festival preparations and rituals typically extend over a five-day period. Before Diwali night, people clean, renovate, prepare sweets, snacks and decorate their homes and offices. On Diwali night, people dress up in new clothes or their best outfit, light up diyas (lamps and candles) inside and outside their home, participate in family puja (prayers) typically to Lakshmi – the goddess of fertility and prosperity. After puja, fireworks follow, then a family feast including mithai (sweets), and an exchange of gifts between family members and close friends.  Here’s a picture of us from Diwali night.

image1

So this Diwali I tried my hands on something more unique and out of my comfort zone. I am still amateur when it comes to making Indian sweets. This time I tried pista (pistachio) paan. As its name suggests, it comprises pista (pistachio) which is shaped in form of a paan. Pista barfi is rolled out evenly as a sheet and given a cone shape like paan then filled with dry fruits.

fullsizerender_1

Ingredients

Yields: 24 pieces.

For Pista Barfi

  • Pistachios 2 cup
  • Milk Powder 1/2 cup
  • Corn flour -2 tsp
  • Powdered sugar -2 tbsp.
  • Edible green color 8-10 drops
  • Condensed milk -4 tbsp.
  • Cardamom powder 1/2 tsp

For Filling

  • 4 tbsp. pistachios, blanched, peeled and chopped
  • 4 tbsp. almonds, blanched, peeled and chopped
  • 4 tbsp. walnut, chopped
  • 8-10 drops Kewra essence
  • 1/2 teaspoon cardamom (elaichi) powder
  • a few saffron strands(optional)

Decoration: Edible silver sheets

Method:

  • Place a small size pan over medium heat and add the shelled pista (pistachios) Roast the pista (pistachios) at medium low heat by continuously flipping so that they don’t get burn.
  • Let the pista cool down and then grind them in mixer to a fine powder. Sieve the powder to get rid of any bits of pista left.
  • Add the milk powder, sugar, cardamom powder and corn flour. Mix it well, add few drops of edible green food color. Add 1 tbsp. of condensed milk.
  • Mix it with hand, it will turn into crumbly texture, keep adding condensed milk 1 tbsp. at a time until you can form a dough. If not add little more condensed milk.
  • PS: Don’t knead the mixture too much else pista will release oil and it will be difficult to handle.
  • Chop the dry fruits and set aside.
  • In a small pan take 2 tsp of butter or ghee (clarified butter) on low heat, add 3 tbsp. of condensed milk and stir it. Add chopped dry fruits, cardamom powder and kewra essence. Stir for 1 minute and turn off the heat.
  • PS: Do not cook the filling mixture for long time else it will get hard like rock. Now keep the filling mixture aside.
  • Using the rolling-pin, roll out this dough in between 2 sheets of wax/ parchment paper until it is thin.
  • Cut squares pieces, you may roll again the scrap pieces or enjoy them as pista barfi. I created another pista dessert which I will share with you in my next post.
  • Join the opposite corner and then join the center to the other corner creating a cone. Fill the cones with the mixture and garnish with silver leaf. I did not have silver leaf at home and could not find it any of the Indian stores nearby.
  • Your home-made Pista paan mithai is ready to serve 🙂 Enjoy!!

Vegetarian Seekh Kebabs


Kebab is a broad term covering a wide variety of grilled meat dishes. Although often cooked on a skewer, many types of kebab are not. Kebab dishes can consist of cut up or ground meat or seafood, sometimes with vegetables; cooked on a skewer over a fire, or like a hamburger on a grill, baked in a pan in an oven, or as a stew.

Today I tried a vegetarian version of these lip smacking seekh kebabs that can be prepared at home.

FullSizeRender-3

The vegetarian version is loaded with veggies, flavorful spices & cooked in not so authentic manner. I do not have a coal lighted barbecue/mini tandoor/sigree. 😦 I have it on my list of things to add and improve my kitchen 🙂

IMG_7649

      Ingredients

  • Potato -3
  • Carrot-2
  • Peas- 1/4 cup
  • Corn – 14 cup
  • Onion- 1
  • Green chilli- 4-5 (depends on taste)
  • Coriander – a little
  • Panut powder 3Tbsp
  • Mint -5-7 leaves
  • Ginger garlic paste – 1 ½ tsp
  • Crushed dry red chilli – 1 Tbsp
  • Bread Crumbs – 1 bread
  • Roasted Besan/gram four – 6-8 Tbsp
  • Garam masala – 1 tsp
  • Salt – to taste
  • Cumin Powder – 1½ tsp
  • Kashmiri red chili – 2 tsp
  • Lemon Juice – 1½ tsp
  • Butter/ olive oil
    
     Method:
  • Boil and mash the potatoes.
  • Boil carrot, peas, corn in a microwave and then let it cool for 10 minutes before grinding it in a mixer, pulse the veggies until very finely chopped – kind of minced.
  • Add – onion, green chili, coriander, mint leaves and process it to a very fine mixture. You can add ginger and garlic to this mixture if you wish to use fresh paste vs. bottled ginger garlic paste.
  • Transfer all the contents  (potatoes, veggies, onion -ginger- garlic- corianer paste) into a mixing bowl.
  • Add 3 tbsp nut powder (I used raosted peanut powder) , cumin powder, kashmiri red chili powder, garam masala, ginger garlic paste, lemon juice & salt to taste.
  • Using hands, mix all the ingredients together. Add the roasted besan, &  bread crumbs. Mix all ingredients making a dough kind of, if it is very sticky and has much moisture and not forming into dough, add more Roasted besan & Bread Crumbs.
  • After it starts turning into dough kind of mixture, let it rest for 10-15 minutes minimum.
  • Grabs small portion and start shaping into slight oblong shape. You may press the kebabs on the seekh/ skewers at this time or cook it and then put it on skewers. If you plan on putting the skewers now, dip your hands in water, and shape the seekh kebab in the skewer using your hands. Make sure the kebab mixture is nicely distributed over the seekh, thickness should be equal in all sides, otherwise it may fall while cooking.
  • Since I do not have  a coal lighted barbecue/mini tandoor/sigree, I decided to cook the kebabs over a chalni (sieve). I decided to cook 2 kebabs at a time in the chalni, so that its easy to turn them around. I did not use the skewers while cooking it. I inserted the skewers at the end before serving. Another tip: if you used skewers for cooking , please soak the skewers in water for 20 mins so that they don’t burn.FullSizeRender-2
  • Once you see the crisp reddish- black layer, take them out, spread some butter, sprinkle chaat masala and lemon juice and serve it hot.
           FullSizeRender-4
It is still possible to enjoy the soft veg seekh kebabs even without a tandoor at home. Hope you will give it a try!

Chilli Garlicky Mushroom


Sorry for not posting any recipes for so long! I am back and will try and be regular from now on. Watch out for my latest cooking!

IMG_7659.JPG

I recently tried this appetizer for a house party. It is quick, simple and easy to prepare. It turned out great and guests enjoyed it a lot.

      Ingredients:

  • 16 oz cleaned button mushrooms – stems removed (optional)
  • 10 cloves garlic – chopped/ minced in a mixer
  • 2 Tbsp finely chopped parsley
  • 3 dried chili – finely crushed
  • 3 Tablespoon extra virgin olive oil
  • 2 Tablespoon lemon juice
  • ¼ teaspoon red pepper flakes
  • Salt to taste, (you may also use garlic salt)

      Method:

IMG_7658.JPG

  • Place skillet or wok over high heat then add oil.
  • When the oil is hot, add garlic then saute for 1 minute (don’t burn the garlic).
  • Add the rest of the ingredients.
  • Cook for about 5 minutes.
  • Add the mushrooms and cook for 5-7 minutes.
  • Serve warm
  • ENJOY!

SPINACH- PEAS CURRY


DSC_1335

Just bought fresh baby spinach from Costco over the weekend. I decided to make another spinach curry most popular in India. This curry is easy to cook, it’s totally vegan. This is another great recipe of people avoiding dairy products temporarily. Couple of tweaks using this same spinach curry- you may add potato/sweet potato/ corn/ paneer/tofu instead of peas. This curry can also be eaten without any toppings. The key ingredient for this recipe is spinach and peas. It is the easiest curry which can be prepared within 30 mins (15 min prep and 15 min cooking time).

DSC_1321

Ingredients:

  • 1 cup frozen peas or boiled fresh peas
  • 2 cup baby spinach, boiled, drained and cooled
  • 2 tbsp. cooking oil
  • 1 tsp. cumin seeds
  • 1 large onion
  • 1 inch piece of ginger
  • 1-2 cloves on garlic – optional
  • 1-2 green chillies
  • 1 medium sized tomato
  • 1/2 tsp. turmeric powder
  • 1/4 tsp. crushed chillies or chilli powder
  • 1 tsp. coriander powder
  • 1 tsp. salt, or to taste
  • 1/2 tsp. garam masala
  • 1 cup of water, approximately

Method:

  • Boil spinach leaves for 10 minutes in small amount of water.
  • Drain it and allow it to cool for some time.
  • If using fresh peas you will want to slightly boil it (5 -7 minutes in boiling water).
  • While the spinach is getting boiled, finely chop ½ onion and keep aside.
  • Roughly chop tomatoes green chilies, ginger and garlic.
  • Grind the cooled spinach along with the green chilies, tomato, onion, ginger and garlic to a fine paste and keep aside.
  • Heat oil in a pan.
  • Add the cumin seeds, wait for it to crackle
  • Add the finely chopped onions. Fry for 2-3 minutes, until lightly brown on medium flame
  • Add the spinach paste to the above. Keep it on low flame- to avoid spluttering of spinach all around.
  • Add turmeric powder and salt to taste.
  • Simmer it for 10 minutes.
  • Add frozen peas or boiled fresh peas.
  • Finally add garam masala & chili powder
  • Add 1 cup of water (adjust as needed)
  • Cook for 5-7mins. Turn off the flame.

Cooking Tips:

  • Do not cover the spinach curry if you want a vibrant green color. (Since I covered it while cooking the color changed to olive green)
  • To reduce the bitterness of the spinach you may add a spoonful of plain yogurt. Tomato also helps, but in turn changes the vibrant green color.
  • A trick my mom shared with me and I am sharing with you folks- to avoid spinach to splutter all around, cook it over low medium flame, leave the ladle in the pan. This will ensure no to minimal spluttering.

Serve it with hot hulks/chapatti/rice. try this dish folks and leave me your comments.

DSC_1319

AAM KI LAUNJI (RAW MANGO CURRY)


Aam/Kairi Ki launji is another of my favorites. Kairi is another word for unripe green mangoes in India.My mom always cooks these in summer. She uses raw baby mangoes (Kairi).  You can use frozen raw mangoes (cut) or else use fresh raw mango. I like to use the fresh ones, because, they are more flavorful during the hot summer months.
The best thing, it can be eaten as a main dish and also can be added as a side.

Ingredients

  • 1 large raw mango
  • 1 tbsp olive oil/ any oil of your own choice
  • A pinch of hing/asafetida
  • 1/2 tsp jeera/cumin seeds
  • 1/4 tsp methi/fenugreek seeds
  • 1/2 tsp fennel seeds
  • 1/4 tea spoon turmeric powder –
  • 4 tbsp Sugar/honey (adjust if mangoes are not sweet)
  • Salt -according to the taste
  • 1/2 – 3/4 cup Water

Method

  • Wash the mangoes. Peel and cut into 2 inch pieces.
  • Boil the mangoes for 8-10 mins, strain and keep aside.
  • Heat oil in a pan
  • Add cumin seeds, methi, and fennel seeds into it.
  • Once the methi seeds are turning light brown in color, add hing to it.
  • Add the boiled mangoes and mix them well.
  • Add the spices: turmeric powder, salt. Mix them well
  • Add sugar and water and let it cook for 8-10 mins on low medium flame.
  • Once the mangoes are tender. Turn off the flame.
  • Ready to be served with Rice or paratha and chapatti.


Hope you like it!

STUFFED CAPSICUM (BELL PEPPER) IN CASHEW NUT CURRY


DSC_1209

I was confused about how to prepare the bell pepper for dinner. I wanted to cook something simple using  bell pepper and potato (the most common way it is cooked in India). But instead I decided to make it using potato  and cheese stuffing.

Since I wanted to serve with roti (Indian flat bread), it needed a curry otherwise it would have been really dry. So far, whenever I have eaten stuffed bell peppers, they are served as one big bell pepper. It is usually hard to eat and messy if you are eating it out.

I decided to slice the bell pepper horizontally, so that they are easy to eat. Also, one large bell pepper can easily serve two individuals. You may choose to use different color and get small/medium size bell pepper for this variation.

The cashew nut curry is thick, creamy and rich. I like to cook it occasionally to change the taste buds from usual tomato/onion gravy.

Ingredients:

Stuffing

  • 1 green bell pepper, small
  • 1 red bell pepper, small
  • 2 small, potatoes, boiled, peeled and mashed
  • 1-2 green chilies, slit, de-seed and chopped
  • 2 tbsp parmesan cheese
  • ¼ teaspoon red chili
  • ½ teaspoon cumin powder
  • Pinch of garam masala
  • Salt & pepper, to taste

Curry

  • 1 onion, medium, roughly chopped
  • 2 tomatoes, medium, roughly chopped
  • 2-3 garlic cloves, roughly chopped
  • 2-3 cardamom pods, lightly crushed
  • 2 bay leaves
  • 10-15 cashew nuts (whole)
  • 1/4 tsp. ginger-garlic paste
  • ¼ tsp. garam masala
  • ½ teaspoon chili powder
  • ½ teaspoon cumin powder
  • 1/2 cup whipped yogurt (low-fat plain yogurt)
  • 3-4 teaspoons olive oil (any oil of your preference)
  • Coriander leaves
  • Salt to taste
  • Water

DSC_1208

Method:

Stuffing

  • Boil the potatoes in microwave/pressure cook them
  • Peel, mash and keep aside
  • Add the Parmesan cheese and chopped green chilies to the mashed potato
  • Add pepper, salt, garam masala, red chili powder and cumin powder to the mashed potato.
  • Mix everything together and keep aside.
  • Take bell peppers, remove the stalk and take out all the seeds with a knife. Cut the bell peppers horizontally into thick circles (1/2” in width)
  • Take each bell pepper circle and stuff it with the potato mixture.
  • Spray olive oil on a grill pan and grill the stuffed peppers for 5-7 minutes on each side till they are light brown in color. Set aside.

Curry

  • In a pan heat 2 teaspoon of oil on medium heat and add lightly crushed cardamom pods and bay leaf to it. Saute for a minute or two.
  • Add chopped garlic and cook till garlic is light brown in color.
  • Add roughly chopped onions and cook till translucent.
  • Add the tomatoes and cashews.
  • Cover it with a lid and let it cook for 6-8 minutes on medium heat till tomatoes are soft.
  • Switch off the gas and let it cool
  • Remove the bay leaf from the mixture and puree it to a fine paste.
  • In the same pan, heat 1.5 teaspoon of oil on medium heat. Once hot add the ginger-garlic paste and saute for 2 minutes, ensure the raw smell is gone.
  • Add the puree mixture and cook for 3 minutes
  • Add the dry spices – paprika powder, cumin powder, red chilli powder, garam masala and salt. Also add around 3/4th cup of water at this point.
  • Cover and cook the curry for 5-6 minutes on medium flame.
  • Open the pan and add the whipped yogurt. I like to add yogurt instead of heavy cream/ milk
  • Cook the curry for 2 minutes on medium flame.
  • Add the stuffed bell peppers to the curry, cook for 2-3 minutes and switch off the flame.
  • Garnish with some chopped coriander leaves and serve hot.

DSC_1202

I would love to hear back from you! Let me know when you try it 🙂

VEGAN KEEMA SEEKH KEBABS


dsc_1224

Seekh Kebabs are a signature North Indian recipe which is all time crowd pleaser on special occasions. When people hear “Seekh kebabs” they are reminded of delicious, juicy kebabs made of minced meat of either lamb/chicken. They not only serve as a terrific appetizer but can also be served as a side dish to the main meal. Another, all time favorite starter is “Hare Bhara kebabs”. These are usually small circular patties made with spinach and potato. Hara Bhara kebabs are another mouth-watering appetizer spotted on restaurant menus in northern India.

Today, I have transfused the ” Kebabs” with “Hara Bhara kebabs” giving it a new twist. The recipe is adapted from FoodPunch. This is an easy, vegan, healthy recipe which can be tried with few key ingredients. This vegan appetizer has been made with goodness of peas, spinach, soya chunks and potato.

dsc_1225

Some of the folks might not be familiar with soya chunks; to clarify soya chunks are nuggets  made out of soy flour batter dried out in the sun. these can be used in dishes later. They are odourless and tasteless by themselves, presenting to every cook a blank canvas to paint on. The very fact that the boiled nuggets turn spongy, all ready to absorb any flavours you dunk them in, make them a delight to cook with. To soak the soya chunks, place the soya chunks in a deep bowl, add enough hot water so that the soya chunks are fully soaked in water. Cover and keep aside for 10-15 minutes or till they turn soft.

dsc_1222

Health Benefits of Soya Nugget
• Soya nuggets are rich in vitamins, minerals, isoflavones and lecithin, nutrients proven to help lower cholesterol, prevent cancer and loss of bone mass.
• Soya is strongly recommended for diabetics, expectant mothers, growing children, cardiac patients, weight-watchers and the aged.
• A 100 per cent vegetarian high quality protein source that does wonders for young and old.
• Especially great for growing children, as it provides critical vitamins, minerals, fibre and protein.
• Eating more high-fiber foods like fruits, vegetables, whole grains and soya nuggets helps to lose weight.
• Soya nuggets are one of the best non-fish sources of essential omega-3 fatty acids, which may help reduce the risk of coronary heart disease.
• Soy protein may provide positive results for people with high blood pressure.
• Soy protein is beneficial to women in post-menopausal years.
• Soya is low in fat and sodium, and may help reduce the risk of heart disease.

Ingredients 

  • 1 cup fresh/ frozen green peas
  • ½ cup baby spinach
  • ½ cup soaked soy granules
  • 2 small potato, boiled, peeled and mashed
  • 2 green chillies
  • Ginger
  • Handful of fresh coriander leaves
  • ½ tsp cumin powder
  • ½ tsp dry coriander powder
  • 1/4th tsp black pepper powder
  • A pinch of garam masala
  • 1/2 cup bread crumbs (fine)
  • Salt to taste
  • Skewers

Method:

dsc_12361

  • Boil green peas with a little salt, drain and spread it on a towel to remove all excess water.
  • Boil Soya Chunks as described above. Squeeze the water out of soya chunks and shred them using your hand.
  • Boil the baby spinach leaves, squeeze out the water and churn it in a blender to make a thick paste.
  • Boil Potato, peel and mash it
  • Slit, de-seed and finely chop the green chillies
  • Finely chop a tbsp full of ginger and the coriander leaves.
  • In a mixing bowl add the mashed potato, shredded soya chunks, green peas and the spinach paste.
  • Add the chopped chillies, ginger and all the spices.
  • Then add the bread crumbs and mix it well.
  • Divide the mixture into 6-8 equal parts. Lightly grease your palm and press each part along the length of a skewer to make each kebab approx 5 inch in length.You may also give it any shape you would like.
  • Heat medium flat frying pan. Spray olive oil, place three kebabs and let it cook, rolling on all sides untill golden all around. Alternatively, you may choose to deep fry.Serve hot with our favorite green chutney and spicy tomato ketchup.

dsc_12262

Would love to hear back from you! Please tray and leave me your comments!!

CHATPATE BAINGAN (EGG PLANT)


dsc_1255

Very recently I posted a recipe on “Achaari” Paneer. The flavors are still lingering on my tongue. I love the spicy, astringent and tart flavor of the pickles.The Achaari flavor comes from basic pickling spices; mustard, cumin, fennel seeds, nigella seeds, fenugreek seeds and red chilli which are prominently used in North Indian pickles. The combination of these flavors with paneer was absolutely phenomenal. I had an eggplant in my refrigerator and I decided to combine them together for dinner tonight.

I dislike eating eggplant and have never attempted to cook it before.  Although I have watched my mom cook an eggplant several times before. Since my husband loves eggplant, I decided to cook him a meal with his favorite veggie. What more can a guy ask for when he returns home to a home cooked meal made of his favorite veggie?!

The recipe includes  basic pickling spices; mustard, cumin, fennel seeds, nigella seeds, fenugreek seeds and red chilli which are prominently used in North Indian pickles.

dsc_1260

Ingredients:

  • 1 medium size Eggplant
  • 1 small Potato
  • 1 small Onion
  • 1 tsp Ginger- Garlic paste
  • ¼ tsp Sugar (Optional)
  • 2 tbsp Oil
  • pinch of Hing/Asafoetida (I used rock/crystal)
  • 2 springs Curry Leaves
  • Salt to taste
  • 1 tsp Rai/Mustard Seeds
  • 1 tsp Jeera/Cumin Seeds
  • ½ tsp Saunf/Fennel Seeds
  • ½ tsp Methi/Fenugreek Seeds
  • ¼ tsp Kalonji/Nigella Seeds
  • 1½ tsp Dhania/Coriander Powder
  • ½ tsp Haldi/Turmeric Powder
  • 1 tsp Red Chilli Powder/Paprika
  • 1 tsp Garam Masala
  • 1 tsp Amchur/Dry Mango Powder

dsc_1257

Method:

  • Chop the eggplant into semicircular pieces. Ensure the width of the each piece remains nearly same, this helps in cook it evenly. Soak them in a bowl of cold water to prevent them from discolouring.
  • Chop potato lengthwise (the way you would want it for french fries). Soak it in another bowl with water.
  • Chop onion in 1″ size and soak it in same bowl as the potato.
  • Heat oil in a pan and add mustard seeds, fennel seeds, cumin seeds and nigella seeds.
  • When the mustard seeds crackle add fenugreek seeds.
  • Once the fenugreek seeds turn light brown in colour, add hing and curry leaves and give it a quick stir.
  • Add ginger-garlic paste and fry it till raw smell disappears.
  • Mix in turmeric, coriander powder, cumin powder and chilli powder and fry the spices for half a minute on low-medium flame.
  • Drain the water from the potato & onion and add to the pan. Mix them well.
  • Cover it using a lid. I like to pour little water on the lid- the steam aids in cooking the potatoes faster. Additionally nothing sticks to the pan or gets burnt. Cook it for 5-7 mins
  • Drain all the water from eggplants and add it to the pan. Mix them well.
  • Cover the pan with lid again. Let it cook for 3-4 minutes on medium flame.
  • Open the lid and stir in salt to taste. Cover and let it cook for another 5-7 minutes on medium flame, stirring after every 2 minute.
  • Next add garam masala, sugar and amchur powder and mix them well. Let it cook uncovered for few more minutes till the eggplants and potatoes are cooked through. They should be soft but not mushy.
  • Serve it hot with Indian flat breads (phulka/chappati)

dsc_1258

Enjoy the Chatpate Baingan! Look forward for your comments 🙂

TWISTED TIKKIS (PURPLE CABBAGE PATTIES)


dsc_1230

Finally the Purple cabbage tikkis are here!

I was grocery shopping and saw the purple cabbage. The color attracted me and I wanted to try something new with it. Aloo Tikkis are very popular north Indian snack. But these days we are all so conscious of our health, I thought why not use the purple cabbage as the main ingredient to make this tikki.

These tikkis are colorful, crunchy and healthy options for your next burger recipe.

dsc_1233

Ingredients:

  • Small potato, boiled and mashed– 2
  • purple cabbage, shredded – 2 cup
  • ½ red bell pepper, finely chopped
  • salt to taste
  • Small onion, finely chopped – 1
  • green chili, chopped -1-2 (depends on how spicy you want)
  • garam masala powder – ¼ tsp
  • red chili powder – 1 tsp
  • dried mango powder (amchoor) – 1 tsp
  • oil spray to cook

Method:

  • Take a mixing bowl. Add all the ingredients to it except oil, and mash well.
  • Divide the mixture into 8-10 equal sized balls. Gently flatten them.
  • Heat a flat pan. Spray some oil to it and let it cook, turning occasionally on either sides
  • Remove from the pan when there is brownish crust on either side.
  • Serve hot with your favorite ketchup or chutney. Enjoy!

dsc_1236

Try and let me know did it turn out !!!

ACHAARI PANEER


Achaari (sometimes also known as achaar or achar) means pickle. This is a dish that is made with all the spices one would normally use in an indian pickle. It is spicy & tangy. It can be eaten with either rice or roti.

dsc_12211

Hope you like the flavors! Do try it and leave your comments.

Ingredients: you will need-

  • 250 gm cubed paneer (I usually cut them in rectangular pieces)
  • 2tbsp olive oil
  • 1 tsp fennel seeds (saunf)
  • 1 tsp black mustard seeds (sai)
  • 1 tsp fenugreek seeds (methi daana)
  • 1/4 tsp nigella seeds (onion seeds – Kalonji)
  • 1 tsp garlic-ginger paste
  • 1.5 tsp zeera (cumin seeds)
  • 1 large red onion
  • 1/2 cup red and green bell pepper (chopped into 1″ square pieces)
  • 3-4 green chillies slit length wise, you may just add depending on your taste
  • 1 tsp turmeric
  • 200 ml whipped curd
  • 2 tsp dry mango powder
  • 1 tsp kashmiri mirch
  • 1 tsp sugar

Method:

  • Heat the oil
  • Add fennel, fenugreek, nigella and cumin seeds. Let it get brown.
  • After 15-20 seconds, add green chillies. Stir and fry.
  • Add the onions, Stir and fry. Let it be golden.
  • Add the peppers. Stir and fry.
  • Add turmeric powder, ginger- garlic paste. Fry for a minute.
  • Pour in the yoghurt, dry mango powder, chilli powder, sugar and salt.
  • Cook until oil separates.
  • Add paneer cubes. The curd will leave some water. You may also add about 1/4 cup water if you need more gravy. Simmer for 5-7 mins and serve hot.

Enjoy the Achaari paneer with hot phulkas. Yumm!

dsc_12261

BURNT CHILLI GARLIC NOODLES


dsc_1214

The following recipe is adapted from eCurry. I love eating Indo-Chinese cuisine. The chilli garlic noodles are my favorite. Anytime, we eat Indo-Chinese outside, I would order these noodles. I have made spicy garlic noodles several times before, but I wanted to try this recipe solely for the medley of flavors from garlic and burnt chillies. The strong aroma blends in perfectly with the Hakka noodles.

If you like eating food that is hot, has a distinct charred taste to it, you will love these noodles. Please try it and leave me your feedback.

Ingredients:

  • 2 packets of Ching’s noodles (5.3 oz)
  • 1.5 tablespoon oil + a teaspoon oil to cook the noodles
  • 2 tsp red crushed chili Flakes or use 3-4 dried whole red chili peppers if you want it less spicy
  • 3 large garlic cloves (about 3/4 tablespoon chopped or to taste)
  • 3/4 cup thinly sliced/julienned vegetables ( I used onion, carrots, green bell pepper and scallions) (white parts)
  • 2-3 tablespoon of scallions, thinly chopped (green parts only)
  • salt to taste
  • 1 teaspoon vinegar
  • 1 teaspoon soy sauce (dark soy sauce)

Method:

  1. Boil the Ching’s noodles as per instruction on the label. Set it aside
  2. Heat 1.5 tablespoon of oil. Add the crushed chili pepper flakes, the whole dried red chilli and let them cook, sizzle and brown (I have added the red chilli flakes and the dried whole chillies). They will turn dark brown after a while.
  3. Add the chopped garlic. Allow them to turn golden. Increase the heat and add the vegetables and salt. Quickly stir fry moving them around in the wok/pan, for a couple of minutes only.
  4. Add the drained noodles, and toss everything together for the oil and the vegetables to combine well. Add vinegar and soy sauce to the noodles. Toss again so for the vinegar and soy sauce combines with the noodles. Switch off the heat and adjust salt.
  5. Garnish with chopped green onions. Serve warm.

dsc_1209

KHAMAN MINI DHOKLA


dsc_12071

Khaman dhokla (Gujarati: ઢોકળા) is a vegetarian food item that originates from the Indian state of Gujarat. It is a savory steamed cake made from fermented batter derived from rice and chickpea splits. Dhokla is soft and fluffy, mildly tangy-sweet and a great snack anytime of the day. It can be eaten for breakfast, as a main course or as a side dish.

Every time my husband and I would bring the ready to eat dhokla’s available in Indian stores, I would say, I should try making it at home sometime. I was talking to my mom when I  mentioned it to her about buying the dhokla maker next time I’m in India.  Guess what!!! In my next parcel – I received the idly- dhokla maker. I adored this combo. Love the size of the cooker. I must say it is perfect size for two people and can easily serve unto 6 people. Mom’s are the simply the best!!

The first time I made dhokla using a ready made mix, it did’t turn out good. Next time I decided to try making it from scratch and it came out real good!

dsc_1170

As you read below, I have cooked it using steaming technique in the dhokla maker. Since my dhokla maker had both idly & dhokla plates, I tried making dhokla in idly plates/pan.

INGREDIENTS (measuring cup used, 1 cup = 250 ml)

Dhokla batter

  • 5 cups besan/gram flour
  • 1 tbsp rava or semolina (optional)
  • 3 tsp ginger-green chilies paste, 1 inch ginger + 3 or 4 green chilies crushed in a mortar-pestle
  • 2 to 3 pinches of turmeric powder
  • a generous pinch of asafoetida
  • 5-2 tsp eno or fruit salt or ½ to ¾ tsp baking soda
  • 1 tsp salt or as required
  • 1 tsp lime juice
  • 1 cup water or add as required- the amount of water required depends on the quality of gram flour, so add as required to make a thick yet flowing batter.

Tempering:

  • 2 tbsp oil
  • ⅓ cup water
  • 1 tsp mustard seeds
  • 1 sprig curry leaves, about 8 to 10 curry leaves
  • 2-3 green chili (optional)
  • 1 tsp lime juice
  • 2 tsp sugar

Garnish:

  • 2 tbsp chopped coriander
  • 2 tbsp grated coconut

Step to Khaman mini dhokla recipe:

  1. You may grease a steamer pan with ¼ tsp oil or use olive/vegetable oil spray. I like to spray a little oil and spread using your finger.
  2. Take 1.5 cups besan/gram flour in a mixing bowl.
  3. Add 2 to 3 pinches of turmeric powder, a pinch of asafetida, 1 tsp lime juice and 3 tsp ginger-green chilies paste (I like to add three-four green chillies and 1inch ginger to the mixer and make a paste) and salt as per taste. Tip: avoid adding too much of turmeric powder as then the fruit salt or baking soda reacts with the turmeric powder and makes it red in color, thereby giving reddish specks or tones in the dhokla.
  4. Add 1 cup water or as required to make thick yet flowing mixture.
  5. Add 1 tbsp rava or sooji. This is entirely optional.
  6. Mix them together to a smooth thick batter without any lumps.Tip: The batter should be thick yet flowing. If the batter become thin, add 1 to 2 tbsp sooji/rava or besan.
  7. Take 2 to 3 cups of water in a steamer pan or electric cooker or pressure cooker and bring it to boil. The amount of water to be added depends on the size of the steamer or pressure cooker.
  8. To leaven he dhokla mix commonly used fruit salt ENO is used, which is comprised of 60% baking soda and 40% citric acid. Add 1.5 tsp eno or fruit salt. Some people prefer the alkaline taste and can add upto 2tsp of fruit salt. You may use baking soda too, however baking soda gives the soapy aroma if used in excess. If yoy are adding baking soda, then add from ½ tsp to ¾ tsp. Tip: Both Eno and baking soda react with turmeric powder and gives a reddish tinge or spots in dhokla. So just add little turmeric powder or skip it completely.
  9. Begin to stir the eno with the batter briskly and quickly. The fruit salt should be mixed evenly with the batter or else you get uneven texture in the dhokla.
  10. The batter would become frothy and bubbly, so you have to be quick.
  11. Pour the batter in the greased pan. Gently shake so that the batter evens out in the pan.

Steaming khaman:

  1. Place the pan in a steamer or electric rice cooker or pressure cooker. The water should already be boiling or hot when you place the pan with the dhokla batter. When using pressure cooker, remove the vent weight/whistle from the lid and cover the cooker tightly with its lid.
  2. Steam for 12 to 15 minutes on a medium to high flame.
  3. To check, insert a toothpick/greased knife and if it comes out clean, the dhokla is done. Tip: If the toothpick has the batter on it, then you need to steam for some more time.
  4. Remove the dhokla in a plate. If the pan is greased well, the khaman can be removed easily on the plate.
  5. If you have used a dhokla pan, slice the khaman and keep aside. If you have prepared it using idly pan, no need for slicing.

dsc_1194

Tempering the khaman mini dhokla:

  1. Take a small pan, heat 2 tbsp oil.
  2. Add 1 tsp mustard seeds and allow them to crackle.
  3. When the mustard seeds are crackling, add 8 to 10 curry leaves and to 1 -3 green chiliies (optional).
  4. Then add ⅓ cup water. Be careful while adding water as the mixture sizzles.
  5. Add 2 tsp sugar.
  6. Stir and allow the tempering mixture to come to a boil.
  7. Pour this tempering mixture evenly on the khaman dhokla.
  8. Garnish using 2 tbsp chopped coriander seeds and 2 tbsp grated coconut.
  9. You can serve with coriander chutney/ tamarind chutney/ enjoy as it is.

dsc_1201-e1436578755688

Hope you like my recipe. Please try and share your comments.